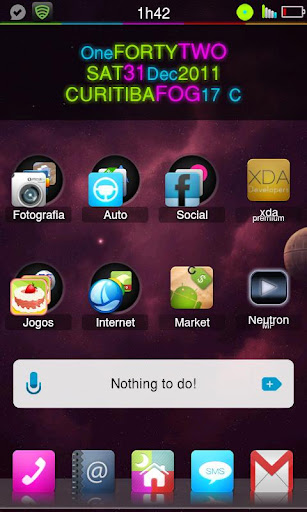
About: Well long time ago I created theme called MEIZU and some time ago I created theme MIUI, both uses special statusbar tweaks, but I have noticed that many other themers started to use these tweaks in their themes so I think it's a good idea to open separate topic about it.
What we can do: enable transparent statusbar enable tablet buttons put operator name on statusbar move clock form right to center on statusbar (idea by Taine0) enable 2nd image for pulled down statusbar and: - adjust date - disable icons
Main window:
1. Browse statusbar tweaks
2. Browse system tweaks
3. Read log
New ideas are welcome
Important: Remember that some roms needs to install statusbar patch twice, so install patch, reboot (you will lost statusbar), install undo and reboot, then once more install patch, do the last reboot and finally it will work - don't know why that many steps, but tested and works well. Same for tablet tweaks, but after 1st patch you will get a bootloop, so put off and put it the battery, go to recovery install undo, reboot, install patch again and phone will work like a charm
To make things easier you device needs the following: The ability to run a CyanogenMod 7 ROM High resolution video out (HDMI preferred for ease of porting)
I finally finished up the "Desktop" configuration guide showing how to use your Evo as a Desktop PC/Workstation. Above is a pic of what I've been using for close to a month now for everything but site updates. It does have it's quirks but after using it for a while I can over look most of them but the browser still drives me nuts. I also have this up on the FullHDMI website with links. Most of the apps are free but please support devs and purchase the full versions. I you think this is worth it let me know and I'll see if I can set up a donate button.
I'm still looking for a dev to work with on creating a "Desktop UI" web browser preferably based on the stock browser.
Added Bonus: If you use the headphone jack instead of HDMI for audio you end up with a speaker phone!!! I use the headphone jack anyways so I can listen to FM Radio without worrying about bandwidth issues.
My Thanks Go To: Sam a.k.a orrebmas, for FullHDMI Full HDMI users, for their thanks and support of all the time and effort that I've put into benchmarking and testing FullHDMI AND HDMwIn CyanogenMod, for putting mouse and keyboard support in CM7 SavagedZen, for the ONLY AOSP Froyo Kernel with HDMI acceleration Shinzul and agrabren, for their civility in spite of the, well you know sbradymobile for making the CM7 mouse patch available bbradley for the heads up on Splashtop RDP
Future thanks goes to the dev that's willing to help with the "Desktop UI" capable web browsing.
Make sure you have the things on the Desktop Configuration list before starting. Now lets get started!
1: Use Titanium Backup to backup all your apps then do a full backup via Rom Manager.
2: Do a full wipe and install the CM7, GApps and the mouseUpdate_signed.zip.
3: Go through your regular inital setup and restore your apps.
4: Install FullHDMI if not already installed and the rest of the apps.
5:
6: Using Root Explorer navigate to system/usr/keylayout and rename qwerty.kl to qwerty.kl.bak
7: Extract the qwerty.zip and using Root Explorer copy the new qwerty.kl file to system/usr/keylayout. Set the qwerty.kl file permissions to User:read/write, Group:read, Others:read.
8: Reboot.
9: BT Mouse Pairing: A: Go into the phone's Bluetooth settings and turn on Bluetooth. Select "Scan for Devices". B: On the bottom of the mouse is a power switch and a pairing button. Turn on the mouse and hold down the pairing button for 2 seconds. C: When the mouse shows up in the device list select it. A popup asking if you want to pair and connect will show up. Select the option. After a couple seconds your phone should say that it is paired and connected to the mouse. It may take a little bit for the pointer to show up and may be sluggish, just give it a few seconds and it will be ok.
10: Keyboard Pairing (This one's a little tricky) A: Go into the phone's Bluetooth settings and turn on Bluetooth. Select "Scan for Devices". B: On the bottom of the keyboard is a power switch and a pairing button. Turn on the keyboard and hold down the pairing button for 2 seconds. C: When the keyboard shows up in the device list select it. A popup asking if you want to pair and connect will show up. Select the option. D: After a couple seconds your phone will ask for a pin code, enter what any four digit number but remember what the number is. E: On the keyboard press and hold the left "Windows" key and F2 at the same time for about a second. Immediately afterwards, using the number keys and not the number pad, enter the four digit number that you entered on your phone and hit the "Enter" key. The BT indicator should stop blinking and flash solid then go out. Your keyboard should then be paired.
USING YOUR EVO AS A DESKTOP
Here we will cover how to use your Evo as a desktop computer. First I will go over the keyboard and it's functions. The image below is the new keymap assigned to the keyboard. The red areas are keys that I was unable to map (trying to map them broke ALL keys including the ones on the phone) as they need new key assignments written to the ROM. The yellow areas are keys that are unmapped or I haven't remapped yet. The green is the newly mapped keys. I do have an image of the keyboard with the scan codes on it if someone would like to give additional mapping a try. Moving along....
1: Go to Settings / Applications / Development and enable "Stay Awake". This will prevent your EVO from sleeping while connected to a charger and believe me you'll want to have your EVO on a charger when using it as a desktop.
2: If you are using an overclocking app that has profiles, make sure you have a "Max Performance" profile while charging in place. You can use dynamic clocking but it has a serious effect on performance unless properly tuned for "Desktop" use.
3:
4: Using LCDDensity for Root, set your display density to 180 and click apply. Your phone will fast reboot and when done everything on your display will be smaller.
5: Turn on your keyboard and mouse and then turn on Bluetooth on your EVO. Your keyboard and mouse should connect after a little bit but I have found tapping on the space bar and mouse buttons seems to help.
6: (Optional) Launch Android Seven for a desktop like UI.
7: Connect your EVO to your charger and display and enable FullHDMI.
8: Long press any text input and change "Input Methed" to Null Keyboard
9: Surf the web and have some fun.
I know this may seem like a lot of steps however after the initial setup it's gets much easier. It would go something like this; Set LCDDensity, turn on BT, connect phone to charger and display and launch FullHDMI. This takes only a minute or two and will probably be up and running before most PC's. Now for the bug list...
Known Bugs and Quirks:
Mouse wheel selects from side to side not up and down like normal. Nobody has been able to fix this and seeing that CM7 is out it's most likely will not be.
Left mouse click and drag scrolling.
The already mentioned keymapping. I'll keep playing with this to see if I can get a better keymap without have to add additional scan codes to the ROM.
Razer Orochi bluetooth mouse left click not working properly (not sure if it's the mouse or HID. Added anyway to cover all the bases. Thanks herrerarivera for the info)
There are a few things I need to tweak, but I thought I'd just get it released.
If anyone wants to port it to MDPI, be my guest. MDPI/LDPI version can be found here I haven't tested it, so let me know! ----------- MDPI Version can be found here credits to amri----------
Massive credits goto jasonevil, zdunex25, all the free to use image PSDs out there! v-Xemnes label theme, Tjdyo for his iphone theme. more that i've probably forgotten :/
There are a few bugs out there, still some orange things hanging around that I need to change. You really need to have a transparent status bar to use this Theme to it's full effect and use zdunex25's notification xml change app. (i'll post the link later.)
Chargebar is used for the battery status and battery icon is switched off in CM7 settings. 360 modified launcher is the launcher too.
Edit: To address some peoples issues, this theme will be mainly orange if you're on MDPI, I have not modified this theme for MDPI phones. I may get round to it, but It will be orange.
---- To fix deskclock issues use the fix found here
---- The launcher used is my own version of 360 launcher which you can download here
CyanogenMod (pronounced sigh-AN-oh-jen-mod), is a customized, aftermarket firmware distribution for several Android devices (See above for supported devices & how to install CyanogenMod on said devices). Based on the Android Open Source Project, CyanogenMod is designed to increase performance and reliability over Android-based ROMs released by vendors and carriers such as Google, T-Mobile, HTC, etc. CyanogenMod also offers a variety of features & enhancements that are not currently found in these versions of Android.
While this build is heavily optimized, it is also capable of pushing your phone much harder. CyanogenMod and it’s team hold no responsibility to any damage caused to your phone, loss of earnings as a result of damaging your phone or anything else that is connected to the development of this rom.
For a list of devices officially supported by CyanogenMod, check out the official devices page. Such is the craze for CyanogenMod, that devices that aren’t officially supported, still manage to receive ports of the ROM courtesy of enthusiasts and developers. CyanogenMod offers the most barebone Android experience coupled with some very powerful tweaks. This whole package by now is not wholly developed by CyanogenMod developers alone, but is a collaborative effort between them and independent developers on sites like XDA-Developers.
CyanogenMod right now, is based on Android 2.3 Gingerbread and referred to as CyanogenMod 7. The variants of the ROM are split into 3 categories, Stable, Release Candidate and Nightlies. The Stable ROM, as suggested by the title, is the tried and tested variant of the ROM proven to be mostly bug free and suitable for daily use. The latest stable version is available for an assortment of the officially supported devices. A Release Candidate (RC) ROM may not be the final version, but a variant that has no fatal flaws or bugs, with the potential to lead to the final product, that is the Stable variant. Lastly we have the Nightlies, which are as volatile as a firmware can get. These releases keep coming at an interval of a day or two and if you do end up trying one of these, do not be alarmed if the your device goes cuckoo on you. These ROMs are largely untested, and as advised by CyanogenMod, not meant for use for an average user. These releases, are meant to test untested waters that may or may not break your phone.
The guide has been split into the following topics:
User Interface
Music Player
Camera
Lockscreen (CyanogenMod Settings)
Permission Management (CyanogenMod Settings)
Phone Goggles (CyanogenMod Settings)
Input (CyanogenMod Settings)
Interface – CyanogenMod Settings
Performance (CyanogenMod Settings)
Miscellaneous CyanogenMod Tweak
User Interface CM7 sports the most Vanilla look you can find on a Gingerbread ROM. Being an AOSP initiative, the ROM isn’t exactly the flashiest ROM aesthetically, but the simplest and to the point. Bear in mind that CyanogenMod ROMs are aimed at maximizing the performance and experience of the Android OS, looks are a priority but a second one. However, there are a lot of users out there who find this Vanilla approach very appealing.
If you happened to have come across a stock Google Nexus S, you will find a starkling resemblance between the Homescreen on that, and the CM7 Homescreen where both sport the Gingerbread Vanilla look. However, CM7 is using the ADW Launcher here as compared to the Gingerbread Launcher on Nexus S. While the ADW app drawer here looks pretty slick with the transparencies and all, the fluid vertical scrolling can be nauseatic for some. Fortunately, the ADW settings can be tweaked for a more customized experience. Unlike most launchers, settings for the ADW in CM7 cannot be accessed directly via the Home screen. Hit the Menu button on your device and navigate to Settings > ADW Launcher to be taken to the Launcher settings as seen in the screenshot below on the right.
Apart from the Launcher, CM7 has a few neat tricks up its sleeves. You must have wondered why you do not have the option to remove a particular notification from the Notification Menu that your drag down? Well, you wouldn’t be the first, and it seems like the collective bewilderment has led CyanogenMod to allow us to do just that. All you have to do, is swipe that notification left or right and voila! It’s gone! The CM7.1 ROM now comes with a built-in Screenshot feature that is accessible straight from the Power Menu. Once you tap the button, it will take around 2 seconds for the device to take the screenshot. The delay is there on purpose, unless you want to capture the Power Menu over and over again.
If you thought that was neat, how about some good old theming to go around? CM7 has a built in Theme Chooser allowing you to install from an array of themes available on the internet. By default, the Theme Chooser carries just three themes, which honestly are no different to each other except for a slightly changed color scheme. For some brilliant CM7 themes and instructions on how to install them on your Android device, see the guide on 12 awesome CyanogenMod 7 Themes by Addictive Tips. All themes are simply APK files that need to be installed on your device like any other Android app.
Music Player The Music Player boasts a very clean UI that is easily workable by anyone who has never touched an Android in their life, but a fancy equalizer, paired up with some graphical awesomeness would have appealed to even the most enthusiast Android user.
Did you know while the Music player may be a stock Google Music player, it is a bit touched up and boasts gesture recognition? That’s right, you can now control your music from the Now Playing screen by the help of simple gestures. Gestures that can also be customized, in the blink of an eye. To access this, hit the Menu button on your device and tap Music Settings to be taken to a screen similar to the one below on the left. One very useful feature here – other than Gestures of course – is the ability to lower the volume of the music being played instead of an abrupt pause whenever you receive a notification that is audible. This makes for a more pleasant experience as compared to the abrupt loss of audio. Coming back to Gestures, tap Edit Gestures to see a list of the Gestures available to you.
Where exactly is the edit part you ask? Simply keep a gesture pressed and a Customize gesture message will pop up. Go ahead with that and you will be asked to draw a gesture of your choice. Draw away and tap Done. You’re good to go with the Gestures so go ahead and try them out!
Welcome to the DSP Manager. If you have a pair of high quality headphones lying around that you thought your Android device, wasn’t doing justice to, this app here might just change your opinion. Even better, pair it up with your audio system and we can guarantee, you will feel the difference in your music experience once you’ve done setting the app up.
Run the app from the app drawer and choose the configuration type you want. In our case, we choose the headset, but the same applies for your audio system as well. Just think of it as an AUX out for now. We can’t really tell you which setting to tweak and by how much, it all boils down to the quality of the headphones or the speakers. However, you can gain some serious bass and treble, or even an increase in overall volume with the help of this app.
Camera The CM7.1 ROM finally brings to us the Touch to Focus feature which had been previously missing. Tap anywhere on the screen and the camera will try to focus on that part of the screen. You see the green focus box? It had Megan Fox in focus, but the point here is that the Touch to Focus feature works like it should. Of course you will have to enable that in the camera settings under Focus Mode. There are plenty of other obvious camera tweaks to play around with depending on the make and model of your Android device. Oh, and you can double tap on the screen to zoom in and out.
You also get to adjust the focusing behavior of the camera while at it. Or if you want, set a timer for moments where you badly want to be in a picture yourself.
Lockscreen – CyanogenMod SettingsTo set it up, navigate to Settings > CyanogenMod Settings > Lockscreen > Lockscreen Gestures. Enable the use of lockscreen gestures and if you want, you can enable the gesture trails as well, which is advised for the first time user. Set the sensitivity which in essence more of an accuracy adjuster. That done, hit the Build Gestures tab and Add Gesture. You have 4 actions to choose from here, Unlock Phone, Toggle Sound, Shortcut or activity and Flashlight. Once the action is chosen, draw the gesture of your choice and hit Done. Go ahead and try it out on the lockscreen!
If you’re wondering what’s with the the slider lock, and even better, how are there 2 of those? No need to be alarmed, it’s just another normal everyday CM7 feature. Even that music playback control at the bottom. To change the lockscreen style, navigate to CyanogenMod Settings > Lockscreen > Style options and tap the Lockscreen Style button as shown in the screenshots below. You can also choose the Incoming call style which works in pretty much the same way as the lockscreen itself.
To launch an app directly from the lockscreen, you can either add a gesture as mentioned earlier, or create a custom slider, that when unlocked, would launch that particular app. You can do that by navigating to CyanogenMod Settings > Lockscreen > Style and enabling Custom app starter. Once enabled simply choose the app of your choice and voila! You’re done!
The only widget that the CM7 lockscreen natively supports is the music player. You can enable that by navigating to CyanogenMod Settings > Lockscreen > Widget options. From there, you can enable or disable the music widget and consequently tweak it up a bit in light of the few settings available.
Permission Management – CyanogenMod Settings Android is no stranger to spyware, neither are CM7 developers. Users want control of the application down to last permission. What your app can and cannot access has become very important since we realized our smartphones are very much capable of compromising our privacy, be it phone numbers, passwords, or credit card numbers. While there are third party apps out there that can help you manage your apps permissions and more, CM7 tackles this issue head on by allowing you to revoke any permission you deem unfit for any app. All you have to do, is navigate to CyanogenMod Settings > Application settings and enable Permission management. That done, exit the menu and navigate to Settings > Applications > Manage applications and tap on an app to bring a up detailed view of the app, scrolling down to find the various listed permissions. Tap on any to strike it out, and consequently revoke the permission till it’s undone by tapping it again.
Be very careful when revoking permissions. When you’re not sure about the permission you’re revoking, your app may start to force close, or in our case after we took a bunch of screenshots from Shoot Me, the folder turned out to be empty. Reason? We tinkered with the permissions, and undid that, but strangely so that dint work till we restarted the phone. Advice for novice users, stay away!
Within the Application settings you also get the option to choose the app installation location. You can either set it to Automatic (recommended), Internal or External. Or if you’re not sure, simply enable Allow application moving to be able to move an application of your choice to the SD card.
Phone Goggles – CyanogenMod Settings Phone Goggles? Why couldn’t they just name it Phone Filter or Communication Filter, at least that way no one would have to read the description to figure out what it actually does. This nifty little tweak has more oomph to it then it seems. Also known as “Drunk Mode”, this tweak here is what could save you from making an embarrassing call in an embarrassing condition at an embarrassing hour. Phone Goggles will filter out the numbers you shouldn’t call or text depending on the period you have defined for it to run for. To enable Phone Goggles, navigate to CyanogenMod Settings > Enable Phone Goggles and choose the application you want to filter. If you’re a frequent caller, choose Dialer, or if you’re an impulsive text person, select Messaging. Either way you can use the Default settings or you can choose to use the custom settings and adjust the period when Phone Goggles will run, along with the type of confirmation that would be prompted. In our case, Math problem!
Note that this app will not prevent you from making a call, only make you think twice, or thrice, or, you get the drift.
Input – CyanogenMod Settings Over here you can customize a few functions that are binded to the hard and soft keys on your device. For example, you can choose a resultant action when you keep the Home or Menu button pressed. More so, you can define the behavior of the Search key as well, where you can assign a custom app to it. By default, CM7 offers no feedback once you release the button, but you can easily enable that from the Haptic feedback tweak menu.
Interface – CyanogenMod Settings This menu houses options that have the potential to tweak the UI a bit. Starting in order, we have Power Prompt, enabling which, you will be prompted if you want to proceed every time you power off the device or reboot it. Notification power widget if you haven’t guessed by now, are the toggle options you get on the top of your notification menu. You can now customize that widget to exclude or include the buttons of your choice, tweak the colors or even change the order in which they appear. You can swipe left or right to scroll through the widget in the notification menu.
Status bar tweaks houses all your tweaks related to the status bar obviously. One really neat feature CyanogenMod has included in the CM7 ROMs, is the ability to swipe left or right on the status bar to increase or decrease the screen brightness. Handy and subtle, it would make your friends awe in envy. To enable this you need to enable Status bar brightness control in the Status bar tweaks. Other options include hiding the clock, an AM/PM style, enabling battery percentage, a compact carrier label and for the ultimate geeks, dBm value of the signal instead of the usual bars.
Within Interface you will find Render effect. This tweak here will render your device’s color according to the effect you choose. Somehow somewhere depending on how you choose to use it, it also helps in saving some battery as well. If you’re into astronomy and spend some time with your telescope in total darkness, just enable the Red render effect and voila! An all red GUI.
Performance – CyanogenMod Settings CyanogenMod comes with a built-in overclocked kernel. If you were always eager on overclocking your device, but were baffled by countless custom kernels and then the installation procedure, CyanogenMod just made it all easy for you. No need for third party apps such as SetCPU to control your CPU frequency either. Within Performance you will find CPU settings. Here you can define the Minimum and Maximum CPU frequency. Bear in mind that the minimum and maximum range will vary from device to device. Once that is done, choose from a list of governors such as Performance, On-demand, Conservative etc. These governors increase and decrease the CPU frequency accordingly. For example, with the Performance governor in place, your CPU would be at the maximum speed all the time, or with the Conservatie governor, the CPU will try to operate at the lowest frequency possible to conserve battery.
Enabling the just in time compiler (JIT) could increase the performance somewhat. However, if you experience no performance gain at all, simply let it be. Then you have options like locking the home and messaging app in memory, which would speed up your access to the two apps but eat up a lot of RAM.
Miscellaneous CyanogenMod Tweaks A bottom status bar. This tweak was originally a mod on XDA-Developers that found itself integrated into the CM7 ROM after it gained popularity. While the status bar on the top seems alright, it is the Notification menu that can be a nuisance to drag down especially if you’re using the ROM on a Tablet. To enable the bottom status bar, navigate to CyanogenMod Settings > Tablet tweaks and enable the bottom status bar. If you want you can provide the status bar with a dead zone in the middle hence not be able to pull the Notification menu from the center of the status bar.
In Sound you can define a period where the phone will be totally silent by setting up Quiet Hours. There are a few more options such as the option to play notifications, ring tones and alarms via speaker, even when you have a headset connected.
In order to receive automatic updates to the ROM on your device, hit Update notifications and if you haven’t already, register your device with the update servers. However, you will be need the Premium version of ROM Manager installed on your device for this to actually work. So before you proceed with registering the device, be sure to keep the ROM Manager requirement in mind.
 so I think it's a good idea to open separate topic about it.




 CyanogenMod (pronounced sigh-AN-oh-jen-mod), is a customized, aftermarket firmware distribution for several Android devices (See above for supported devices & how to install CyanogenMod on said devices). Based on the Android Open Source Project, CyanogenMod is designed to increase performance and reliability over Android-based ROMs released by vendors and carriers such as Google, T-Mobile, HTC, etc. CyanogenMod also offers a variety of features & enhancements that are not currently found in these versions of Android.


